
How to Measure Piston Ring Gaps - Tips from motorsport pros
Share
Measuring piston ring gaps might sound like a small detail — but in engine building, it’s one of the most important steps for achieving performance and longevity. If you’re assembling an engine, knowing how to measure piston ring gaps accurately is key to preventing blow-by, oil control issues, and engine failure.
This guide walks you through the process step-by-step and shows why using a piston ring squaring tool makes all the difference.
Why It’s Critical to Measure Piston Ring Gaps Correctly
When an engine heats up, piston rings expand. That’s why the gap between the ends — known as the ring end gap — is critical. Too tight, and the ends butt together causing scuffing or scoring. Too loose, and compression drops, leading to lost power and oil consumption.
There’s no guesswork here: the best way to measure piston ring gaps is with accuracy, consistency, and the right tools — including a proper ring squaring tool.
The Limitations of Using a Piston to Square the Ring
One popular method for squaring piston rings is to use the crown of a piston to push the ring partway into the bore. It works — and many builders have done it this way for years. But it can be inconsistent.
Depending on how the piston is held and how squarely it enters the bore, the ring might sit slightly angled, which can throw off your gap measurement. It’s not a bad method, but it introduces room for error, especially if you’re aiming for precision across multiple cylinders.
That’s where a piston ring square tool really shines. It drops the ring to the same depth every time, perfectly flat, giving you repeatable accuracy without the guesswork. It’s especially handy when you’re working with tight tolerances or high-performance builds.
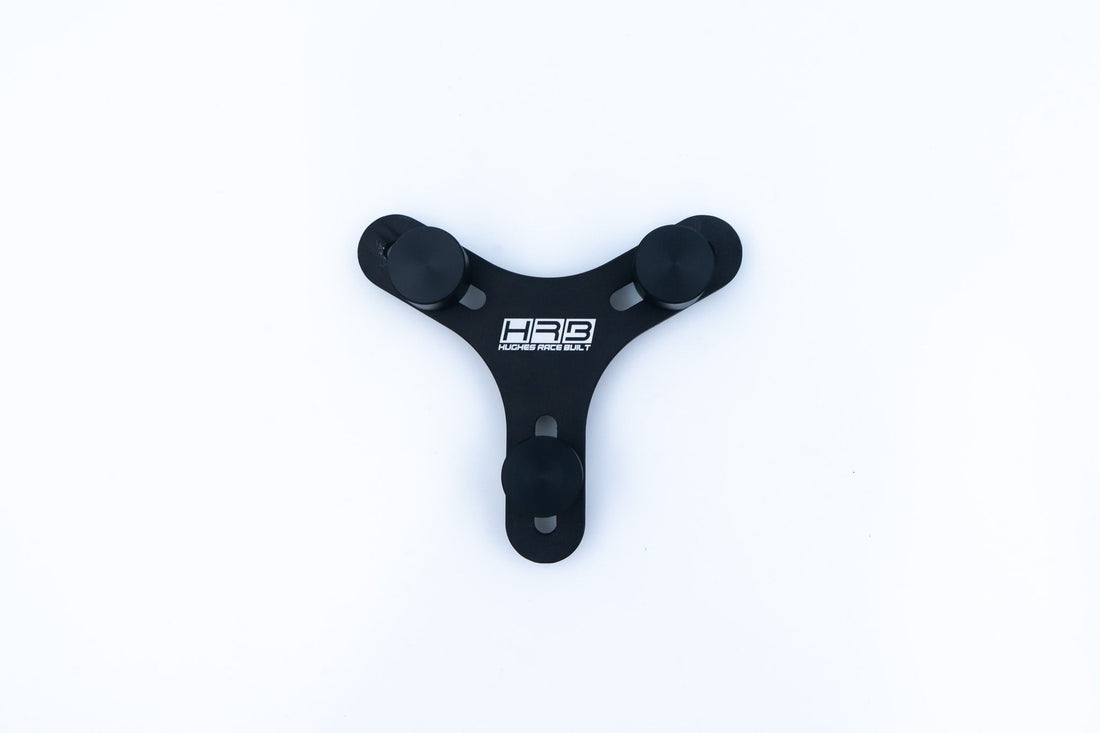
That’s exactly why we designed the HRB Piston Ring Square Tool. It ensures the ring sits level at a consistent depth every time, giving you a true measurement — not a guess.
Tools Needed to Measure Piston Ring Gaps
If you’re wondering what tools are needed to measure piston ring gaps, here’s your checklist:
- Feeler gauge (preferably a complete set with small increments)
- Piston ring square tool (like the HRB ring squaring tool)
- Ring filer or ring grinding tool (like the HRB piston ring file)
- Deburring tool or fine file
- Clean, finished engine block with honed bores
Step-by-Step Guide: How to Measure Piston Ring Gaps Accurately
1. Start With the Right Cylinder
Always gap the ring in the cylinder it will be installed in. Bore diameters can vary slightly, so don’t use just one cylinder for all your measurements, gap each set of rings individually.
2. Use a Piston Ring Square for Consistency
Drop the ring into the bore, then press it down using a piston ring squaring tool. The HRB ring squaring tool drops the ring to the correct depth (typically 10–15mm from the deck), keeping it perfectly level without damaging the bore.
3. Measure the Piston Ring End Gap
Use your feeler gauges to check the gap between the ends of the ring. Slide the gauge in — you want light drag, not force. If the blade won’t fit or is tight, the gap is too small. If it slides in with no resistance, it’s too large.
Refer to your ring manufacturer’s spec sheet, but as a rule of thumb:
4. Adjust If Necessary (File carefully)
If your gap is too tight, use a ring file or ring grinder to carefully open it up. Always file both sides of the ring evenly to keep the ends square. Use a deburring tool or light sandpaper to clean up any sharp edges.
We also have a full kit with everything you need included: HRB Piston Ring File Kit
5. Repeat for Every Ring and Cylinder
Measure and adjust each ring individually. Labelling your rings as you go is a great habit to avoid mix-ups during assembly.
Why a Piston Ring Squaring Tool is a Must-Have
The HRB Piston Ring Square Tool is one of the simplest yet most effective tools in your engine-building arsenal. Made from precision-machined billet alloy, it lets you:
- Drop each ring to the same depth every time
- Keep the ring perfectly level in the bore
- Avoid damaging the cylinder wall
- Get accurate, repeatable results
If you’re trying to build smarter and faster, adding a ring squaring tool to your bench setup is a no-brainer.
Final Thoughts: Build It Right from the Start
Measuring and setting piston ring gaps isn’t the flashiest part of engine building — but it’s one of the most important. Skipping this step, or doing it inaccurately, can cost you power, efficiency, and reliability down the line.
With a little patience and the right tools — especially a proper piston ring square — you’ll be able to dial in your build and get the performance you’re aiming for.
FAQ
Why is measuring piston ring gaps important?
Piston ring gaps control cylinder sealing and engine performance. Too tight and the ends can butt and seize; too loose and you’ll lose compression.
How do you measure piston ring gaps accurately?
Insert the ring into the bore and square it using a piston ring squaring tool. Then use feeler gauges to measure the gap between the ring ends.
Can I use a piston to square the ring instead of a ring squaring tool?
Yes, but it’s less precise. A piston can tilt the ring slightly, affecting accuracy. A piston ring square tool ensures perfect depth and alignment every time.
What’s the best depth to square the ring in the bore?
Most builders place the ring about 10–15mm from the deck surface. HRB’s tool sets the depth consistently for repeatable results across all cylinders.
How tight should the ring gap be?
It depends on your build. Check manufacturer specs, but a common rule of thumb is 0.004” per inch of bore for naturally aspirated engines. Turbo or nitrous builds usually need more.
Can I file rings by hand?
Yes, but for best results use a piston ring filer or HRB’s Ring File Kit. It keeps the ends square and parallel — important for sealing and durability.